Time is so precious. We all want our Android device to run smoothly on its own which will save our time. Lets take a look at a few features that automates our device to make it efficient.
We spend a lot of time using our phones. Sometimes we just idly waste our time meddling with the settings and certain features. Do you know that our Android devices have automated features which will help us save our time?
Our convenience is our first priority, so it's essential that we enable some features of our phone. Android provides us some amazing automated features that you can optimize if you are setting up your new phone or you can check whether your existing phone is already optimized. Let's take a look.
Automatic Google Play Updates
It's very important that you update your apps whenever a new update is available. This will provide your app with new features and settle those security errors. Checking whether you have a new update always and installing them manually is annoying and time consuming. So why not automate it? So that the apps will be updated without our interference automatically.
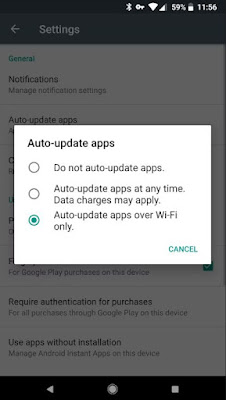
Here's how you enable the automatic update feature. First launch the play store and head to the left menu. Now tap Settings > Auto updates and finally choose the 'Auto update app' over 'Wi-Fi only'. If you choose Wi-Fi only then it won't consume your mobile data.
To make sure everything is working fine you can choose 'Notifications' to get notified when there's a new update or to know that your automatic update is working with no any issue. Now you can keep yourself updated about your updates.
Google Play Protect App Scanning
This recent feature allows you to scan your entire device from any harmful content. You can run the scan when you download a new app or on any time you prefer. But do you want to run it automatically without you meddling with it all the time? Here's how you do it.
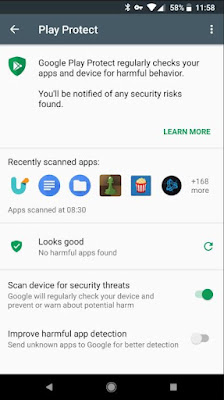
First launch the play store. Slide the left menu, then hit the 'Play Protect' which will show all the settings. Now head to 'Scan device for security threats' and slide to toggle.
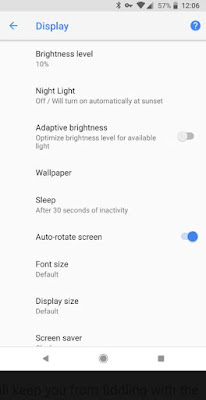
In this case you have to automate the screen brightness system. This will adjust the brightness automatically according to your environment. Although it is not perfect, it somewhat does its job. To enable this feature go to the Settings > Display and allow 'Adaptive brightness' and that's it.
You are done with the settings so you won't have to worry about increasing and decreasing your brightness by yourself. The screen brightness will adopt according to its surroundings. In case the brightness is not enough for you ,you can download this app called 'Android screen brightness'.
Use Smart Store to Save Space
Are you running out of space in your phone? We know this is troublesome. You have to delete those pictures and unwanted files which consumes a lot of space.
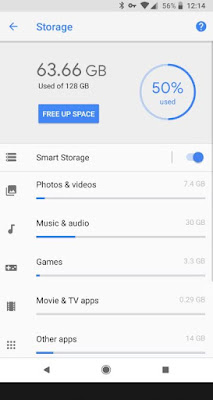
Fortunately our Android Oreo devices got an interesting feature where the old pictures are automatically discarded from your device. Once your space is fully occupied you will get that 'Storage full' message often until you remove some of the files. Our pictures consume a lot of our phone space than the other files, so enabling this feature would be of great help.
Head to Settings > Google storage and then to enable the 'Smart storage' toggle it on to enable it. You can adjust the settings according to the date of the photos so that you can choose whether you want to clear 30 days old photos, 60 days or 90 days.
You can also auto upload your photos to Google photo storage which is free. By doing this all the cleared photos will be saved in your Google cloud for future reference. This would free up all your mobile storage and also you can access your pictures anywhere anytime if you have an internet connection.
Auto Join Wi-Fi Networks
Now you can automatically join the Wi-Fi networks that are available for free in some places. This will reduce your mobile data from consuming more data. It's better that you enable this feature so that you can connect to close by devices where free Wi-Fi is available.
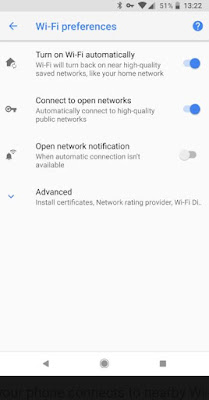
To enable them head to Settings > Network & internet and hit Wi-Fi. You will see a list of options below the Wi-Fi network Option, now select 'Wi-Fi preference' finally tap 'Turn on Wi-Fi automatically'.
You can keep your VPN enabled all the time so you don't have to open it and connect it every time you reboot your device, by doing this you can save your time.
You can enable this option easily. You can also set it up to work everyday at the same time where you can set it up for an automatic schedule system. To set up go to Settings > Sound > Do not disturb preference. You will get the options. You can find the other options like scheduling it or run it according to your own preference. You can find this feature at the top.
Now let's take a look at some 'Automatic rules'. Your device lets you create your own templates by modifying the existing templates to get you started. These templates let you select the specific notifications that you want your device to show and also lets you choose the particular day and time in which this mode should run. Another important feature is that it allows you to schedule your event and you can put it on 'Do not disturb' mode if you have any important event in your calendar that you don't want any disturbance.
Advanced Methods to Automate Android
Above we have learnt few ways to automate your Android device according to your convenience. If you want more features than the given methods then you can download several apps and services for this purpose.
There's this web service called IFTTT which allows you to connect one thing with another. This is one of our favorite services. The specialty of this Android web app is it can change your phone wallpapers to images you want. This also creates applets which can mute your phone at certain times automatically, save your notifications to a spreadsheet and everything that you want.
Do you want to automate your device even more? But not looking for a web app? Then go to 'Tasker' which is one of our favorites. But there's this issue where the functions of this app works fine on a rooted device but in the UI it's a bit complex. This option is great for power users. Also the MacroDroid is another recommended app you can try.
MacroDroid has a polished and a pleasing interface which is opposite to Taskers. This app can run and have more functions on devices that are not rooted. This app doesn't lack in anything when compared to the above apps. There are certain features like a wizard which guide you for the first time and the icons are very easy to grasp. You can take a look at these features if you are interested.
Which is the Best Way for You?
Above we have learnt many tips and tricks on how to make your phone work on it's own without any hassle. These features give you free time and you can do other important tasks in your phone instead of handling certain features. Hope you automated your device after reading the above.
We spend a lot of time using our phones. Sometimes we just idly waste our time meddling with the settings and certain features. Do you know that our Android devices have automated features which will help us save our time?
Our convenience is our first priority, so it's essential that we enable some features of our phone. Android provides us some amazing automated features that you can optimize if you are setting up your new phone or you can check whether your existing phone is already optimized. Let's take a look.
Automatic Google Play Updates
It's very important that you update your apps whenever a new update is available. This will provide your app with new features and settle those security errors. Checking whether you have a new update always and installing them manually is annoying and time consuming. So why not automate it? So that the apps will be updated without our interference automatically.
To make sure everything is working fine you can choose 'Notifications' to get notified when there's a new update or to know that your automatic update is working with no any issue. Now you can keep yourself updated about your updates.
Google Play Protect App Scanning
This recent feature allows you to scan your entire device from any harmful content. You can run the scan when you download a new app or on any time you prefer. But do you want to run it automatically without you meddling with it all the time? Here's how you do it.
There's this option where you can detect harmful apps by sending all those strange apps to Google if you need to, because doing it is not very important right now.
Automatic Screen Brightness
Do you have this issue when you are outside in the bright sunlight where nothing is visible as your phone screen is so dim? Or when you are in the dark the brightness blinds your eyes? This is because your phone brightness settings are not right.
Automatic Screen Brightness
Do you have this issue when you are outside in the bright sunlight where nothing is visible as your phone screen is so dim? Or when you are in the dark the brightness blinds your eyes? This is because your phone brightness settings are not right.
In this case you have to automate the screen brightness system. This will adjust the brightness automatically according to your environment. Although it is not perfect, it somewhat does its job. To enable this feature go to the Settings > Display and allow 'Adaptive brightness' and that's it.
You are done with the settings so you won't have to worry about increasing and decreasing your brightness by yourself. The screen brightness will adopt according to its surroundings. In case the brightness is not enough for you ,you can download this app called 'Android screen brightness'.
Use Smart Store to Save Space
Are you running out of space in your phone? We know this is troublesome. You have to delete those pictures and unwanted files which consumes a lot of space.
Head to Settings > Google storage and then to enable the 'Smart storage' toggle it on to enable it. You can adjust the settings according to the date of the photos so that you can choose whether you want to clear 30 days old photos, 60 days or 90 days.
You can also auto upload your photos to Google photo storage which is free. By doing this all the cleared photos will be saved in your Google cloud for future reference. This would free up all your mobile storage and also you can access your pictures anywhere anytime if you have an internet connection.
Auto Join Wi-Fi Networks
Now you can automatically join the Wi-Fi networks that are available for free in some places. This will reduce your mobile data from consuming more data. It's better that you enable this feature so that you can connect to close by devices where free Wi-Fi is available.
This automatically enables Wi-Fi, when you are closer to your home network. By turning on the features called 'Connect to open networks' it will get connected to the open high quality public networks that are available.
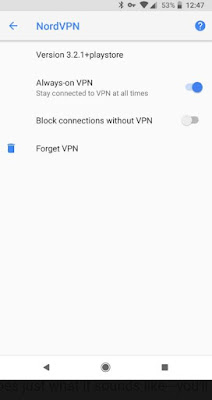
Use VPN
VPN gives a private browsing experience by giving your network maximum security. There are numerous benefits of using a VPN. Do you usually use public Wi-Fi like in a coffee shop or a mall? In this case VPN allows your device to have enough privacy and also protects your activities from anyone spying you. It's worth having it on your phone.
Let's take a look at how to keep this option enabled so you won't have to fuss about it. First go to Settings > Network & internet > VPN.
Next to VPN you will find a gear and click it to open. Now you will find 'Always-on VPN' option which you have to toggle on. There's another option which doesn't allow you to browse the internet without the VPN by tapping 'Block connections without VPN'.
You can find the best VPN app from the play store and sign up if you haven't got it yet. Do you know that many VPNs have auto-correct settings in them, which is great!
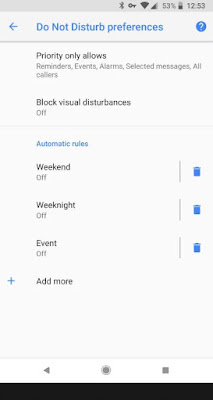
Do Not Disturb Schedule
Are you often distracted with your notifications or incoming calls when you are very busy with work? Then you can enable this feature 'Do not disturb' mode which allows you to keep your phone silent.
You can find the best VPN app from the play store and sign up if you haven't got it yet. Do you know that many VPNs have auto-correct settings in them, which is great!
Do Not Disturb Schedule
Are you often distracted with your notifications or incoming calls when you are very busy with work? Then you can enable this feature 'Do not disturb' mode which allows you to keep your phone silent.
This feature is so essential when you want some silent times either when you are at a meeting or when you want to have a peaceful sleep at night. So make sure you have this tool to reduce the distracting notifications.
Now let's take a look at some 'Automatic rules'. Your device lets you create your own templates by modifying the existing templates to get you started. These templates let you select the specific notifications that you want your device to show and also lets you choose the particular day and time in which this mode should run. Another important feature is that it allows you to schedule your event and you can put it on 'Do not disturb' mode if you have any important event in your calendar that you don't want any disturbance.
Advanced Methods to Automate Android
Above we have learnt few ways to automate your Android device according to your convenience. If you want more features than the given methods then you can download several apps and services for this purpose.
There's this web service called IFTTT which allows you to connect one thing with another. This is one of our favorite services. The specialty of this Android web app is it can change your phone wallpapers to images you want. This also creates applets which can mute your phone at certain times automatically, save your notifications to a spreadsheet and everything that you want.
Do you want to automate your device even more? But not looking for a web app? Then go to 'Tasker' which is one of our favorites. But there's this issue where the functions of this app works fine on a rooted device but in the UI it's a bit complex. This option is great for power users. Also the MacroDroid is another recommended app you can try.
MacroDroid has a polished and a pleasing interface which is opposite to Taskers. This app can run and have more functions on devices that are not rooted. This app doesn't lack in anything when compared to the above apps. There are certain features like a wizard which guide you for the first time and the icons are very easy to grasp. You can take a look at these features if you are interested.
Which is the Best Way for You?
Above we have learnt many tips and tricks on how to make your phone work on it's own without any hassle. These features give you free time and you can do other important tasks in your phone instead of handling certain features. Hope you automated your device after reading the above.